How to Make Pear Wine – Easy Homemade Wine Recipe for Ripe Pears
This post may contain affiliate links. Read my full disclosure here.

When life gives you too many overripe pears, it’s time to learn how to make pear wine. This wine recipe is dry, with a light pear flavor, and is a good use for very ripe and lightly damaged pears.

This recipe is adapted from “How to Make Wine in Your Own Kitchen” by Mettja C. Roate. “How to Make Wine in Your Own Kitchen” is old and hard to find, but if you can find a copy, snatch it up.
The recipes use common kitchen ingredients instead of specialized wine making ingredients, which is great for the novice or incidental brewer. I did tweak the recipe a little to include wine making yeast.
You can make homemade wine with wild yeasts, but it’s easy to make a mistake and go from homemade wine to homemade vinegar.
If you enjoy making country wines with wide variety of ingredients, “Wild Wine Making” by Richard W. Bender is now available from Storey Publishing. It features pear wine, blueberry-pear wine and pear-black currant wine, along with 142 other fun recipes.
There are fruit & vegetable wines; flower & herb wines; hot pepper wines and cannabis wines. The photos are gorgeous and the author takes the mystery out of successful wine making.
You may also notice that yours truly is also mentioned on the back cover, as I was offered a preview of the book before it released.
Homemade Pear Wine Recipe
Ingredients
Adapted from “How to Make Wine in Your Own Kitchen“. Makes around one gallon of homemade wine.
- 4 quarts of chopped, unpeeled ripe pears (approximately five pounds)
- 3 cups of white raisins, chopped
- 6 cups of cane sugar
- 1 cup of light brown sugar
- 4 quarts of water
- 1 packet champagne yeast Order champagne yeast
- 1 teaspoon yeast nutrient (optional) Order yeast nutrient
Directions
Note: If you do not have a crock, you may ferment your wine in any large, food safe container – just don’t use aluminum or anything reactive. Some local hardware stores or home brewing store carry crocks in addition to other fermenting vessels. I use a two gallon crock because the wine foams up during initial fermentation.
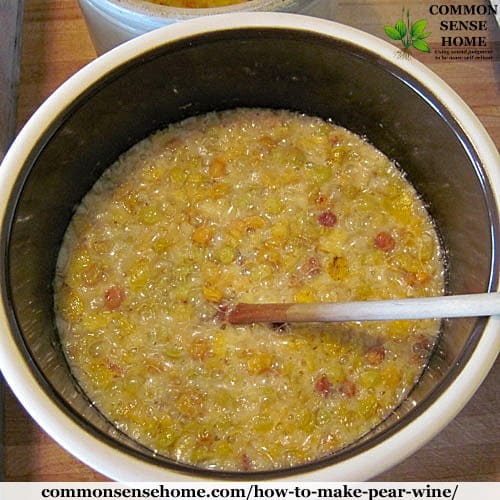
Pears should be ripe enough that stems pull out easily. If not, set aside and wait a few more days. (Pears ripen off the tree.) Wash, trim, quarter and finely chop or crush the pears. Skins are fine to include, but keep the seeds out. Pear seeds are bitter and can give the wine an off flavor. Crush pears with a potato masher or well washed hands. Place pears and raisins into crock.
In a medium stockpot, dissolve brown and white sugar in two quarts water over low heat. Bring to a boil, and then set aside to cool to lukewarm.
Add 2 quarts water to fruit mash in crock, then add the sugar water. Stir well to evenly distribute the sugar throughout the mix. Sprinkle yeast and yeast nutrient over top of mash, stir in to mix until completely dissolved and well blended.
Fermenting the Pear Wine
Cover and keep in a warm location for three weeks, stirring daily and mashing fruit against the side of the crock. I use a flour sack towel secured with an old elastic head band to cover my wines. Fruit flies love fermented foods, so make sure your container is well sealed.
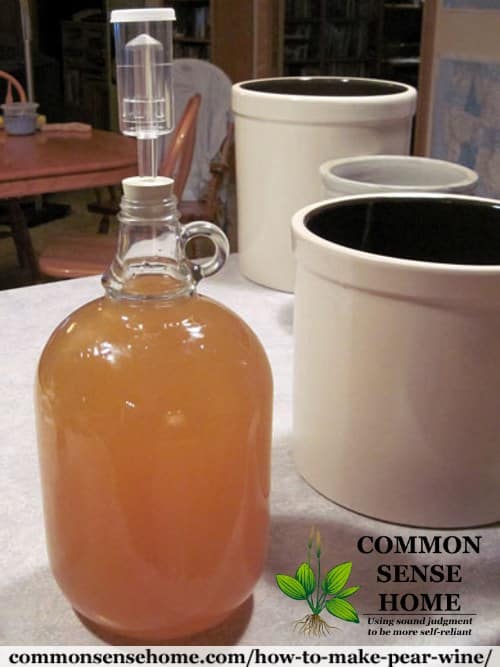
At the end of the initial three week fermentation period, strain mixture through a jelly bag or flour sack towel, squeezing very dry. Return liquid to crock. Set in a warm place to ferment for two weeks longer. No stirring is necessary during this second fermentation.
Would you like to save this?
At the end of the second ferment (which makes five weeks in all), strain liquid through several thicknesses of cheesecloth or a flour sack towel. Siphon or ladle into the strainer, leaving the sediment at the bottom of the crock. (You’re aiming for a clear product at this point.)
Return the clear wine to the crock or a carboy for two days to allow it to settle again. Put the cloudy wine from the bottom of the crock into a two quart jar to settle for two days and then draw off as much clear liquid as possible. Add to the rest of the wine and allow to sit for another day.
Bottling the Pear Wine
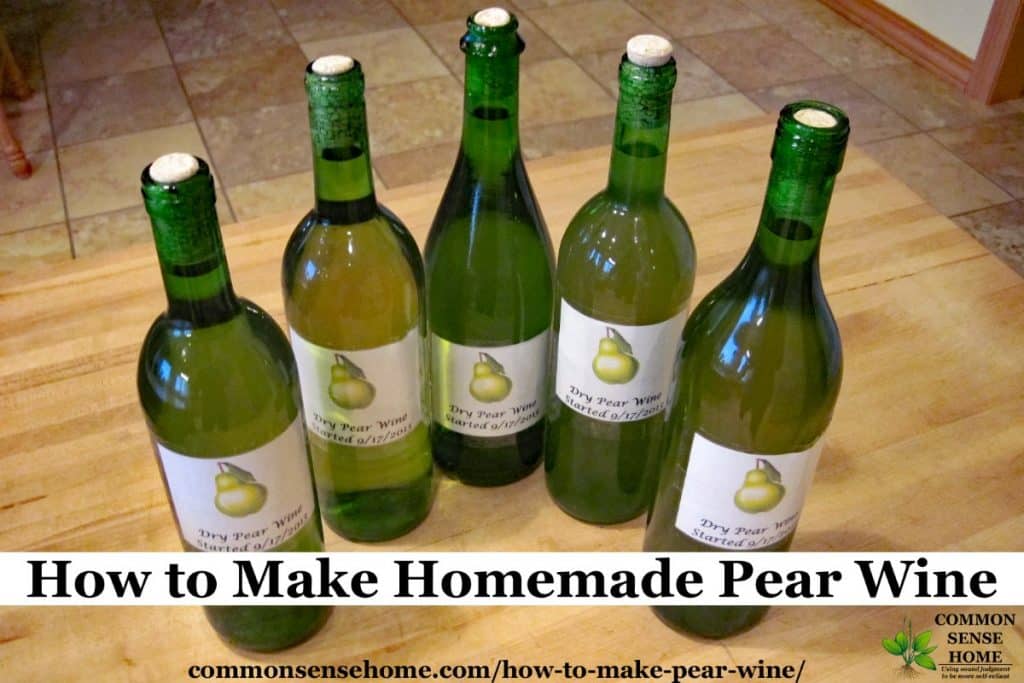
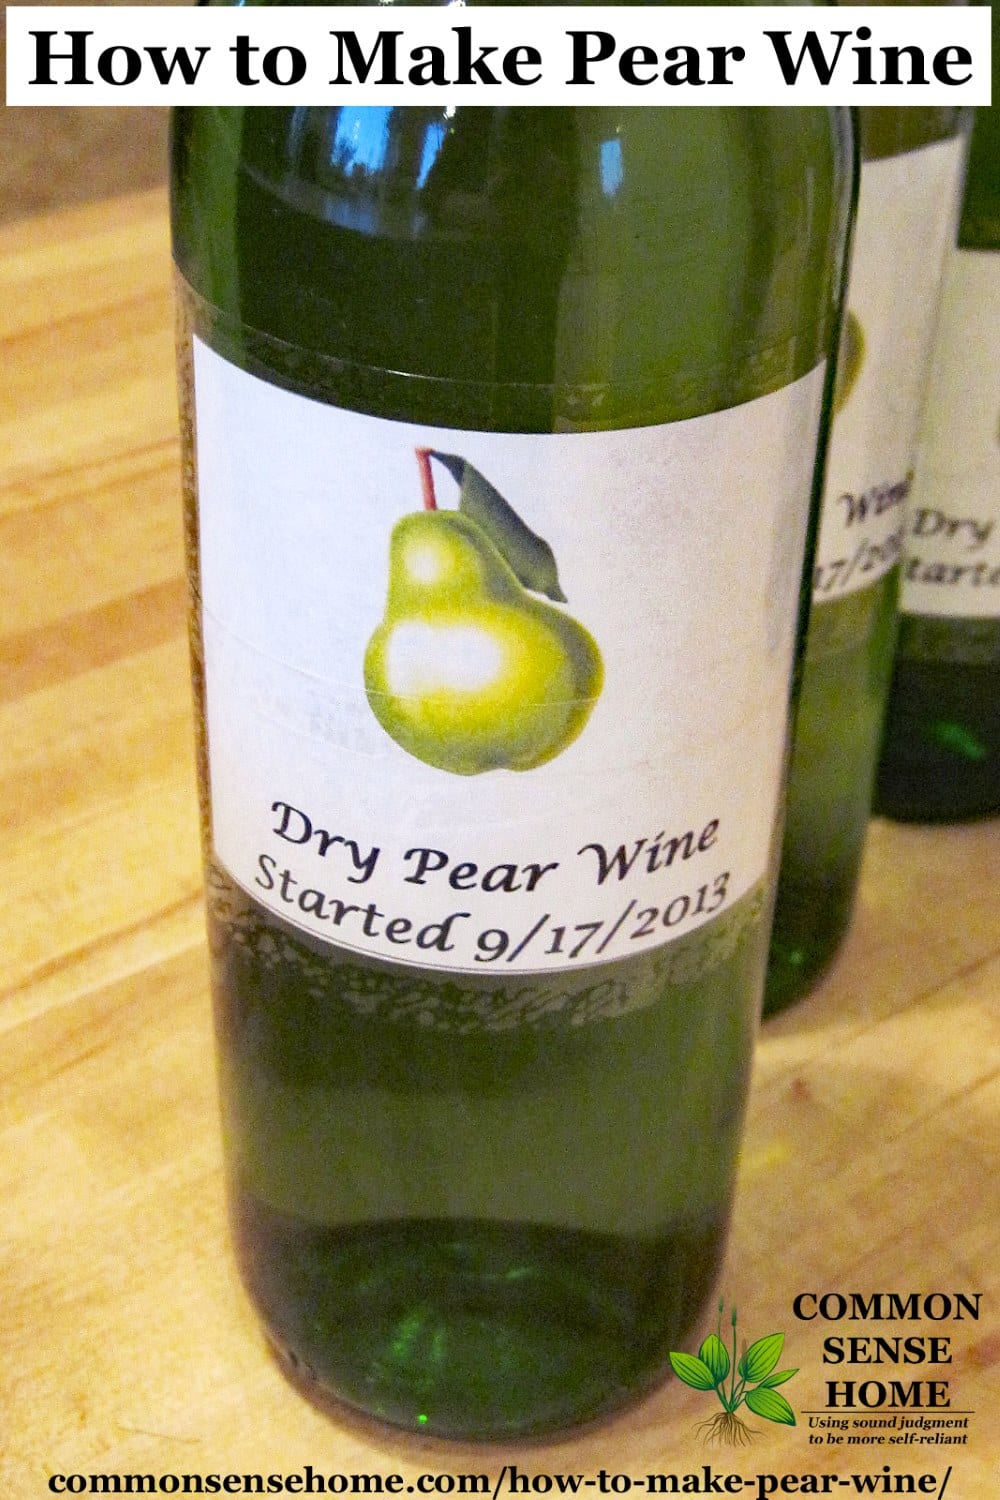
Once the pear wine has settled, you can either bottle it directly into bottles or place in a carboy. There may be a little active yeast at this point, so if you put it in bottles, put balloons over the openings so the gasses can escape. When the balloons don’t inflate anymore, cork the bottles and age in a cool dark location for at least 6 to 12 months before drinking.
If using a carboy, siphon wine into carboy, keeping your siphon hose off the bottom of the crock to leave the wine dregs behind. Place airlock and age in carboy for 6 months before bottling. When bottling, siphon into bottles, leaving dregs in the bottom of the carboy for a clearer wine. We demonstrate in the video below.
Using a carboy gives a clearer wine, since you leave behind the sediment one extra time.
Links to Buy Wine Making Equipment Online
- Two gallon crock
- One gallon glass carboy with airlock
- Wine bottles
- Wine bottle corks
- Double Lever Wine Bottle Corker
Give Your Homemade Pear Wine Some Extra Kick
“How to Make Wine in Your Own Kitchen” notes…
If you desire more character in your wine, add 1/4 pound of candied ginger, finely chopped, at the same time as the raisins. If you desire heat along with the spicy taste, also add ten or twelve black peppercorns.
There was an attempt to market pear wine commercially in this country at one time. However, due to its blandness, winemakers found it had to be fortified up to 20% with pear brandy. Homemade wine can be fortified, too, for better results. I find that using a good grade of grape brandy gives a wonderful flavor. I add this just before the two-day settling period, using about 2 cups of brandy to a gallon.
In France and Germany there is a pear champagne which is made in much the same manner; however, it is bottled and corked tightly, while in the fermenting stage, giving it effervescence when opened.
More Homemade Wine Recipes
Winemaking makes the kitchen smells a bit like hooch at times, but it’s pretty tasty hooch. Homemade wine is great way to use up an abundance of produce that might otherwise go to waste. It’s safe to give the leftover pear wine mash to the chickens, too, or use it to make fruitcake. Just make sure not to give them so much that they get drunk. 🙂
Other homemade wine recipes on the site include:
- Easy Strawberry Wine Recipe – Perfect for Beginners
- Pumpkin Wine
- Dandelion Wine
- Elderberry wine
- Quackgrass Wine
Need more pear ideas? Check out 9 Ways to Preserve Pears, Plus Tips to Prevent Browning.
Print Friendly Recipe
PrintHomemade Pear wine

This easy homemade pear wine recipe combines just a few simple ingredients to turn an abundance of ripe pears into delicious homemade wine.
- Yield: 1 gallon 1x
Ingredients
- 4 quarts of chopped, unpeeled ripe pears (approximately five pounds)
- 3 cups of white raisins, chopped
- 6 cups of cane sugar
- 1 cup of light brown sugar
- 4 quarts of water
- 1 packet champagne yeast
- 1 teaspoon yeast nutrient (optional)
Instructions
Pears should be ripe enough that stems pull out easily. If not, set aside and wait a few more days. (Pears ripen off the tree.) Wash, trim, quarter and finely chop or crush the pears. Skins are fine to include, but keep the seeds out. Pear seeds are bitter and can give the wine an off flavor. Crush pears with a potato masher or well washed hands. Place pears and raisins into crock.
In a medium stockpot, dissolve brown and white sugar in two quarts water over low heat. Bring to a boil, and then set aside to cool to lukewarm.
Add 2 quarts water to fruit mash in crock, then add the sugar water. Stir well to evenly distribute the sugar throughout the mix. Sprinkle yeast and yeast nutrient over top of mash, stir in to mix until completely dissolved and well blended.
Fermenting the Pear Wine
Cover and keep in a warm location for three weeks, stirring daily and mashing fruit against the side of the crock. I use a flour sack towel secured with an old elastic head band to cover my wines. Fruit flies love fermented foods, so make sure your container is well sealed.
At the end of the initial three week fermentation period, strain mixture through a jelly bag or flour sack towel, squeezing very dry. Return liquid to crock. Set in a warm place to ferment for two weeks longer. No stirring is necessary during this second fermentation.
At the end of the second ferment (which makes five weeks in all), strain liquid through several thicknesses of cheesecloth or a flour sack towel. Siphon or ladle into the strainer, leaving the sediment at the bottom of the crock. (You’re aiming for a clear product at this point.)
Return the clear wine to the crock or a carboy for two days to allow it to settle again. Put the cloudy wine from the bottom of the crock into a two quart jar to settle for two days and then draw off as much clear liquid as possible. Add to the rest of the wine and allow to sit for another day.
Bottling the Pear Wine
Once the pear wine has settled, you can either bottle it directly into bottles or place in a carboy. There may be a little active yeast at this point, so if you put it in bottles, put balloons over the openings so the gasses can escape. When the balloons don’t inflate anymore, cork the bottles and age in a cool dark location for at least 6 to 12 months before drinking.
If using a carboy, siphon wine into carboy, keeping your siphon hose off the bottom of the crock to leave the wine dregs behind. Place airlock and age in carboy for 6 months before bottling. When bottling, siphon into bottles, leaving dregs in the bottom of the carboy for a clearer wine.
Using a carboy gives a clearer wine, since you leave behind the sediment one extra time.
Notes
Note: If you do not have a crock, you may ferment your wine in any large, food safe container – just don’t use aluminum or anything reactive. Some local hardware stores or home brewing store carry crocks in addition to other fermenting vessels. I use a two gallon crock because the wine foams up during initial fermentation.
Originally published in 2011, last updated in 2018.
Can I use apples for this recipe and get the same result or any fruit for that matter? thank you
Apples are not as sweet as pears, so the end product will have a different flavor profile, but it will ferment and make a wine.
What’s a good temperature to keep the wine at during fermentation?
During the initial fermentation, normal room temperatures works fine. Once it’s bottled, cooler temps are better, ideally 45-65F. (Thus, the wine cellar or cooled wine storage units.) Like almost all food products, keeping it cool slows the degradation of the product. If you want to get fancy, you can keep at at the warmer end of the range initially, then keep it cooler for longer storage.
This is my second year using this recipe. The first year I made a dry wine this year I changed my yeast for one not so dry. Family wanted a more fruity and sweet wine. Thanks for your time making this post.
I’m glad it worked well for you, and thank you for taking time to leave a comment.
If you have time, could you let me know which yeast strains you used each time?
What yeast did you use to make it more sweet & fruity?
Cote des Blancs from Red Star is recommended for orchard fruits. Saccharomyces Cerevisiae BV7 from Vintner’s Harvest is intended to to produce a sweeter white wine.
I saw your recipe and am in the process of making pear wine as we speak. Next week I get to go to secondary fermentation and strain out all the pear mash. I was just curious if you use pectin enzyme at all. I’ve made blueberry wine and used it, but noticed it wasn’t listed in your recipe. Love to hear your input in it.
If you want a clearer wine, the pectin enzyme certainly helps with that. I usually make country style wines with minimal inputs, so I strain and rack to reduce fines in the wine, but don’t worry if some persist.
It’s a matter of personal preference.
If you’d like to add it to this recipe for a clearer wine, not a problem.
Thank you, Laurie! I can see it now! So excited to give this a try in the coming weeks.
Hi there! I remember seeing your site last year after having canned a ton of pears, so I pinned it for wine making this year and am now not seeing the recipe! Has it been removed, or can you show me where your recipe for this pear wine might be? Am I just missing it?!
Thank you for asking! The blasted new editing system we are now forced to use (Gutenberg) ate most of the post because there was a small error in one of the “blocks”. I think we have the issue resolved and it should be showing up now.
Do you think it would be ok to blend the pears at the start, rather than chopping and later mashing?
You don’t want the seeds and stems in the mix. The seeds can inhibit fermentation.
Gotcha. I just meant after the “wash, trim, and quarter” part. Do you think it would be ok to put the remaining pear chunks in the blender instead of finely chopping or crushing them. Thanks 🙂
Ah – okay. Sure, that’s fine. I usually end up using very ripe pears, so they tend to mush on their own. 🙂
Are the raisins necessary? What is it that they do? Is there anything that can be used in place of them?
The article “Why Does A Wine Recipe Call For Raisins?” explains:
“Raisins may be called for because they are an abundant source of body. They can improve the mouth-feel of the wine by increasing its viscosity. This gives the wine a heartier, overall impression. It also causes the fruit flavors to linger on the tongue longer, producing a fruitier impression.
Raisins also add a caramel element to the wine. This is an effect that is caused by the browning, oxidative effects of sun-drying the raisins. This is the same characteristic found in Ports or Sherrys. This can be an advantage or disadvantage depending on the type of wine and preference of the wine drinker. You can reduce this characteristic by using Muscat, or white raisins instead.”
Some people substitute grapes instead, especially when they’d prefer to avoid the caramel flavor element. You don’t need to add either for the wine to ferment, but adding them adds different flavor elements to the wine.
If you are still monitoring this post, I have a question about Seckel Pears. If I were to use them for wine do I make any changes to the sugar? These are super sweet sugar pears.
If you’re concerned about the wine being too sweet, it’s okay to reduce the sugar, but I don’t have a specific suggestion about exactly how much to reduce it, since I haven’t had the opportunity to try seckel pears.
Can this recipe be doubled easily? I have A Lot of pears?
Sure, that’s fine. One packet of yeast will ferment up to five gallons of wine.
Hi Laurie – Question!
Above you say that one packet of yeast will ferment up to 5 gallons of wine. I think one gallon usually fills about 5 bottles (like in your photo) – is that right? When I look at your recipe and click the “2x” option to double it, it says it makes 2 gallons of wine, but it also calls for 2 packets of the champagne yeast. Is it safe to assume 1 packet of yeast will work here, or is 2 what I should go with? Thanks again!
The 2X and 3X options for the recipes automatically double everything and I don’t have any way to change that, unfortunately.
One packet of yeast will get the job done for 1-5 gallons of wine.
One gallon of wine should fill around 5 bottles, as you noted.
Can you please tell me how many bottles your recipe makes?
The five bottles you see were made from a single batch of the recipe.
it is very good to see this article but i wanted to know have you used any substances to clear the pears wine. Clarity of the wine was excellent. What did you do for clarity of wine? Can you share it to me.
I don’t add a clarifying agent, I just rack the wine carefully when bottling and leave the lees behind in the fermentation vessel.
When I make pear wine I can the pears and make wine with the peelings and cores,It takes 4 lbs. of peelings and cores to make 1 gallon of wine and 2.5 lbs.of sugar.This way I eat the pears and drink the peelings and cores.
Thanks for sharing your proportions.