Fresh Homemade Mozzarella Cheese Recipe – Make Mozzarella Balls!
This post may contain affiliate links. Read my full disclosure here.

You can make fresh mozzarella cheese at home – with just four ingredients! Use your homemade mozzarella to make mozzarella balls from scratch, or stretch it into homemade string cheese.

This posts features the “30 Minute Mozzarella Cheese” recipe from Ricki Carrol’s book “Home Cheese Making“. If you’d like to make traditional mozzarella (which takes a bit longer), check out the “Cultured Dairy and Basic Cheese” e-course from Traditional Cooking School.
This easy mozzarella cheese recipe works best with whole milk. Since I have a friend with a cow, we used whole raw milk. You may use skim milk, but the yield will be lower and the cheese will be drier. You cannot use UHT (Ultra High Temperature) pasteurized milk to make homemade mozzarella cheese (or most other cheeses). The extreme heat of UHT pasteurization damages the protein in the milk and it comes out looking like ricotta, no matter what recipe you use. Try switching brands of milk if your cheese fails, or find a friend with a cow or goat.
To make fresh mozzarella, you will need:
- citric acid
- 1 gallon pasteurized whole milk
- liquid rennet (or 1/4 rennet tablet)
- cheese salt or kosher salt
- large stockpot
- cooking thermometer
- long knife
- wooden spoon
- rubber gloves (optional, for stretching the cheese)
- small fine mesh strainer or microwavable bowl
- bowl of ice water (optional)
Homemade Mozzarella Cheese Recipe (30 Minute Mozzarella)
Yield: 3/4 to 1 pound from 1 gallon milk
Ingredients
1 1/2 level teaspoons citric acid dissolved in 1/2 cup cool, unchlorinated water
1 gallon pasteurized whole milk
1/4 teaspoon liquid rennet (or 1/4 rennet tablet) diluted in 1/4 cup cool, unchlorinated water
1 teaspoon cheese salt (optional)
Directions
1. Prepare the Ingredients
Begin your cheese making process by prepping the ingredients listed above. Dissolve 1 1/2 teaspoons citric acid in 1/2 cup cool water. Place your milk in a large stock pot. Mix your rennet with 1/4 cup cool water.
2. Heat the Milk and Add the Citric Acid
Gently bring the milk up to 55°F ( 13°C) in a large, stainless steel pot. While stirring, add the citric acid solution to the milk and mix thoroughly.
3. Add the Rennet
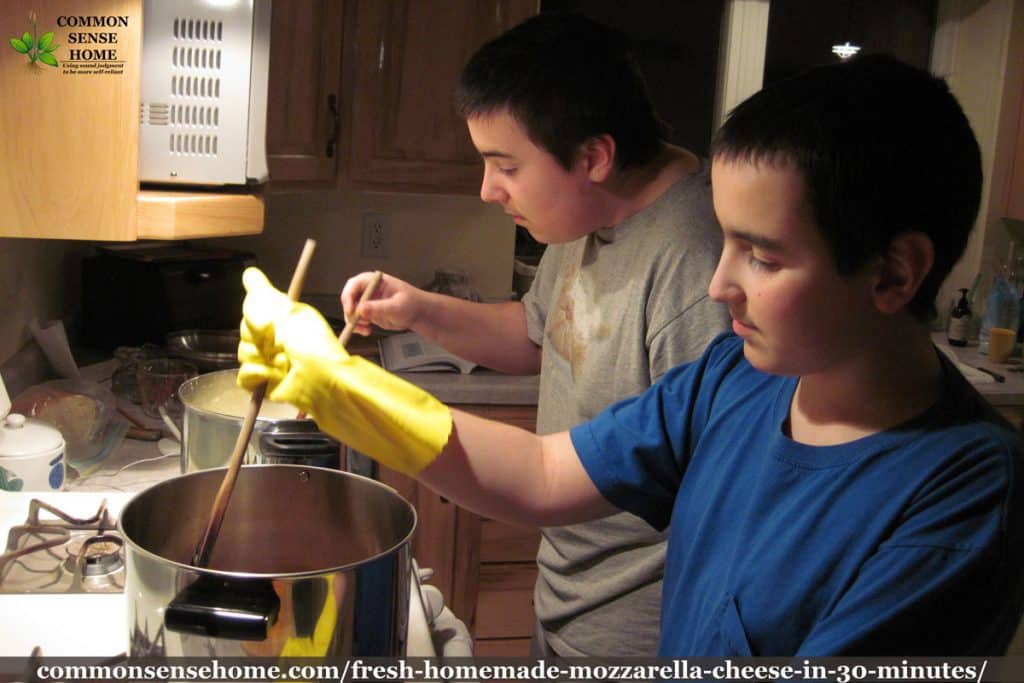
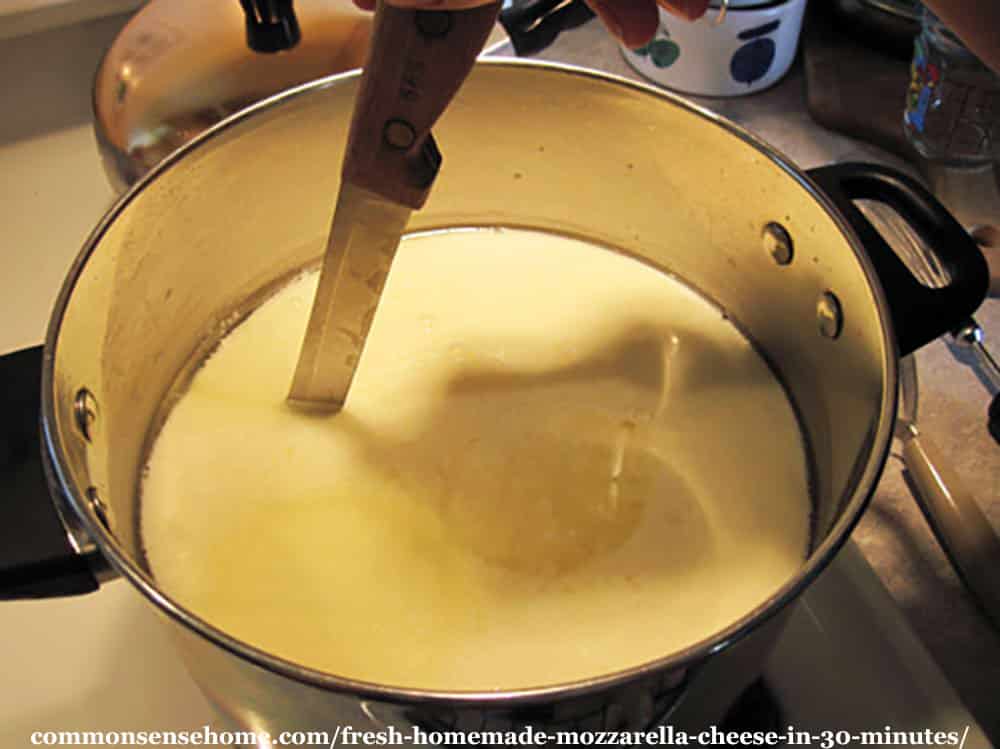
Heat the milk to 90°F (32° C) over medium-low heat, stirring constantly. Remove the pot from the heat and gently stir in the diluted rennet with an up-and-down motion for 30 seconds. (We use a potato masher to move the milk up and down.) Cover the pot and leave undisturbed for five minutes.
4. Cut the Curd
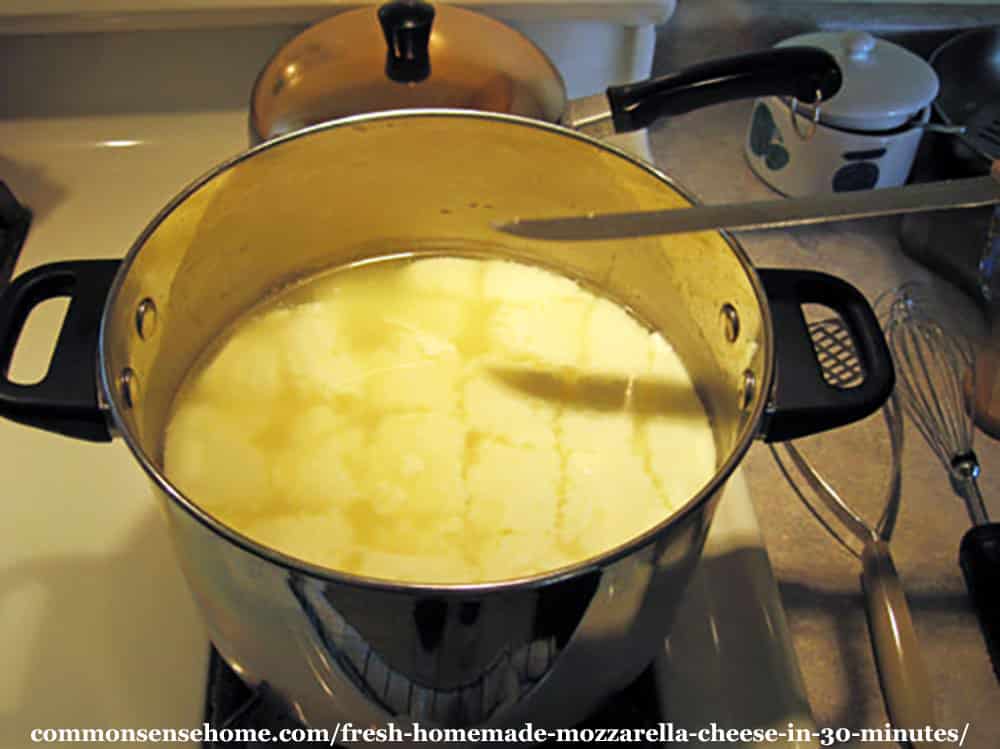
Check the curd. It should look like custard, with a clear separation between the curd and whey. (If the curd is too soft or the whey is too milky, let set for a few more minutes.) Cut the curd with a knife that reaches all the way to the bottom of your pot.
5. Heat the Curds
Place the pot back on the stove and heat the curds to 105°F (40°C), gently moving the curds around with your spoon. Remove from heat and continue to stir slowly for 2 to 5 minutes. (Stirring for 5 minutes will result in firmer cheese.)
6. Drain the Curd
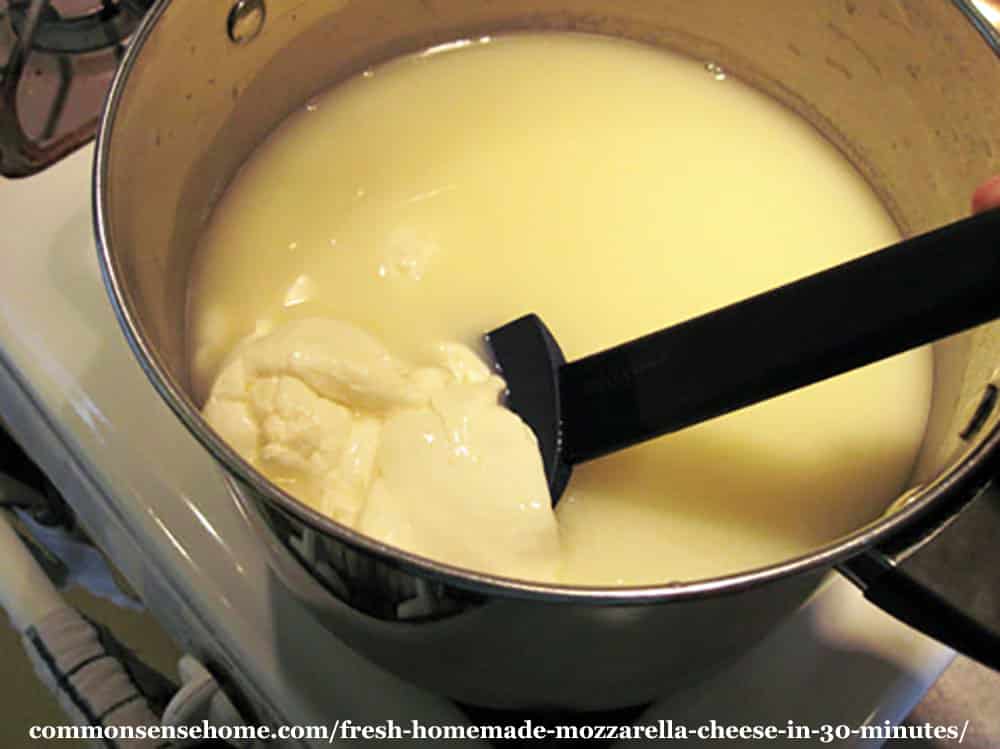
Scoop out the curds with a slotted spoon and put into a 2 quart microwaveable bowl. Press the curds gently with your hands, pouring off as much whey as possible.
***If you do not have a microwave:
After step 6, heat the reserved whey on the stove top to at least 175°F (80°C). Add 1/4 cup of cheese salt to the whey (you could probably substitute kosher salt, but cheese salt is best). Shape the curd into one or more mozzarella balls, put them in a ladle or strainer, and dip them into the hot whey for several seconds. Knead the curd with spoons or gloved hands between each dip and repeat this process several times until the curd is smooth and pliable. Please be careful! This is really hot, and working with more liquid increase the risk of getting splashed!
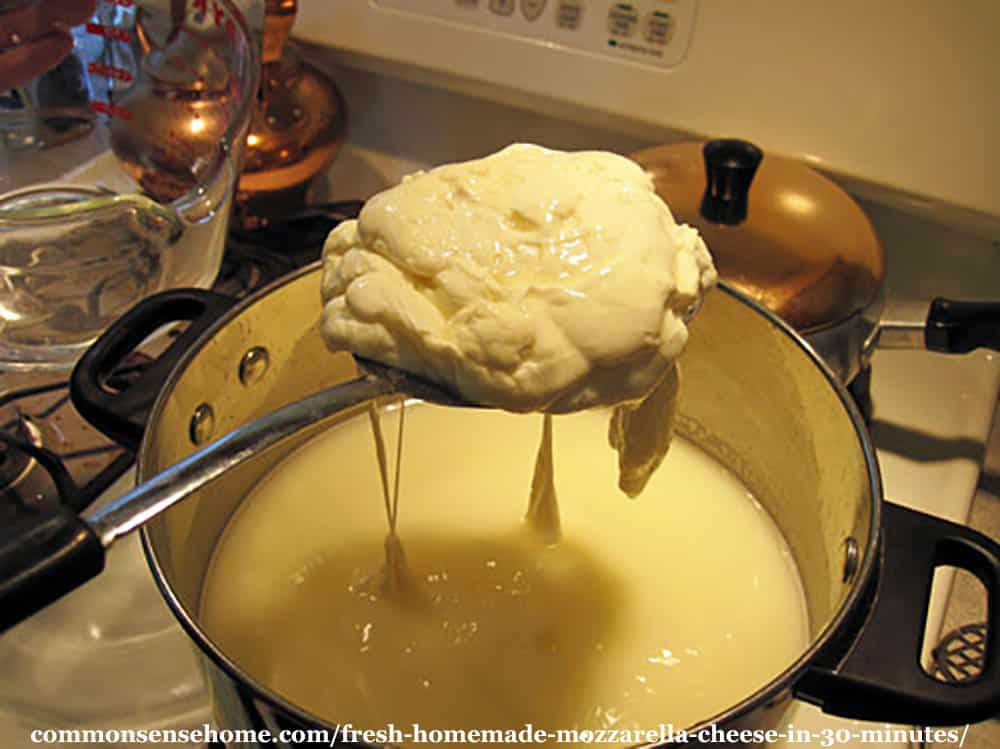
7. Heat the Curds and Stretch the Mozzarella Cheese
Microwave the curds on high for 1 minute. Drain off all excess whey. Gently fold the cheese over an over (as in kneading bread) with your hands or a spoon. This distributes the heat evenly throughout the cheese, which will not stretch until it is too hit to touch (145°F (63°C) inside the curd). Rubber kitchen gloves are very handy at this stage.
8. Stretch and Salt Your Mozzarella
Microwave two more times for 35 seconds each; add salt to taste after the second time. After each heating, knead again to distribute the heat.
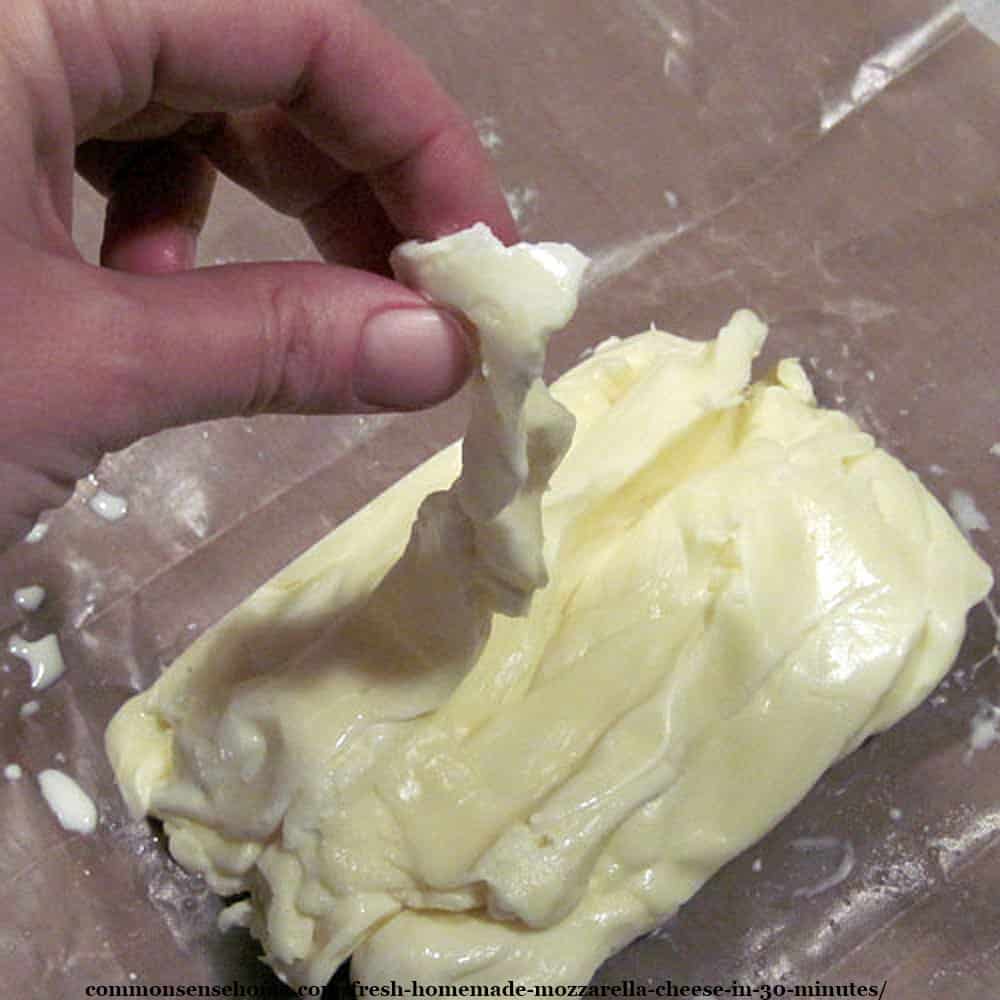
9. Knead the Mozzarella until Smooth and Elastic
Knead quickly until it is smooth and elastic. When the cheese stretches like taffy, it’s done. (See top photo in post.) If the curds break instead of stretch, they are too cool and need to be reheated.
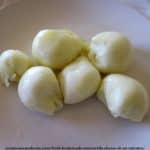
10. Shape the Mozzarella
When the cheese is smooth and shiny, roll it into small balls and eat while warm. Or place them in a bowl of ice water for half an hour to bring the inside temperature down rapidly; this will produce a consistent smooth texture throughout the cheese. Although best eaten fresh, it can be stored in the refrigerator at this point.
With some experimentation, I found you can pull this mozzarella cheese into strips or strings – think “homemade string cheese”. Pull the strips, drop them in the water to cool, then pack them tightly in a Pyrex container or wrap in plastic wrap. They’re not as pretty as the store bought ones, but they work just the same.
Although the original recipe recommended storing the cheese in water, I prefer storing it in a tightly sealed container without water. Water storage makes the cheese soft and washes out the salt.
Optional Lipase Powder
If you want to add lipase powder to give the cheese more flavor, use 1/8 – 1/4 teaspoon, dissolved in 1/4 cup cool water and allowed to sit for 20 minutes. To start, probably try the mild and see how you like the flavor. Add the lipase and water mixture at the same time you add the citric acid solution. If you add lipase to this cheese, you may have to use a bit more rennet, as lipase makes the cheese softer.
Would you like to save this?
Making Mozzarella Balls
You can make your own mozzarella balls to use in recipes or enjoy warm and melty-soft. Just follow the recipe above, and when it’s time to shape your cheese, pinch and roll it into small balls. This works best when the cheese is still very warm and stretchy. If you have a friend to help with shaping, you could stretch the cheese into a long rope and let them snip off small sections with kitchen shears or sharp (clean) scissors to speed up the process. This is a great activity for older kids with supervision (the high heat makes it a little risky for the younger set). They can shape their own mozzarella cheese balls or string cheese and gobble it right up.

You may also enjoy our other recipes, such as, Cheese Soup in Homemade Bread Bowls.
Print Friendly Version
PrintFresh Homemade Mozzarella Cheese Recipe – Make Mozzarella Balls!
Quick and easy homemade mozzarella cheese recipe, ready in about 30 minutes, that you can use to make homemade mozzarella cheese balls or string cheese.
Ingredients
Instructions
1. Prepare the Ingredients
Begin your cheese making process by prepping the ingredients listed above. Dissolve 1 1/2 teaspoons citric acid in 1/2 cup cool water. Place your milk in a large stock pot. Mix your rennet with 1/4 cup cool water.
2. Heat the Milk and Add the Citric Acid
Gently bring the milk up to 55°F ( 13°C) in a large, stainless steel pot. While stirring, add the citric acid solution to the milk and mix thoroughly.
3. Add the Rennet
Heat the milk to 90°F (32° C) over medium-low heat, stirring constantly. Remove the pot from the heat and gently stir in the diluted rennet with an up-and-down motion for 30 seconds. (We use a potato masher to move the milk up and down.) Cover the pot and leave undisturbed for five minutes.
4. Cut the Curd
Check the curd. It should look like custard, with a clear separation between the curd and whey. (If the curd is too soft or the whey is too milky, let set for a few more minutes.) Cut the curd with a knife that reaches all the way to the bottom of your pot.
5. Heat the Curds
Place the pot back on the stove and heat the curds to 105°F (40°C), gently moving the curds around with your spoon. Remove from heat and continue to stir slowly for 2 to 5 minutes. (Stirring for 5 minutes will result in firmer cheese.)
6. Drain the Curd
Scoop out the curds with a slotted spoon and put into a 2 quart microwaveable bowl. Press the curds gently with your hands, pouring off as much whey as possible.
***If you do not have a microwave:
After step 6, heat the reserved whey on the stove top to at least 175°F (80°C). Add 1/4 cup of cheese salt to the whey (you could probably substitute kosher salt, but cheese salt is best). Shape the curd into one or more balls, put them in a ladle or strainer, and dip them into the hot whey for several seconds. Knead the curd with spoons or gloved hands between each dip and repeat this process several times until the curd is smooth and pliable. Please be careful! This is really hot, and working with more liquid increase the risk of getting splashed!
7. Heat the Curds and Stretch the Mozzarella Cheese
Microwave the curds on high for 1 minute. Drain off all excess whey. Gently fold the cheese over an over (as in kneading bread) with your hands or a spoon. This distributes the heat evenly throughout the cheese, which will not stretch until it is too hit to touch (145°F (63°C) inside the curd). Rubber kitchen gloves are very handy at this stage.
8. Stretch and Salt Your Mozzarella
Microwave two more times for 35 seconds each; add salt to taste after the second time. After each heating, knead again to distribute the heat.
9. Knead the Mozzarella until Smooth and Elastic
Knead quickly until it is smooth and elastic. When the cheese stretches like taffy, it’s done. (See top photo in post.) If the curds break instead of stretch, they are too cool and need to be reheated.
10. Shape the Mozzarella
When the cheese is smooth and shiny, roll it into small balls and eat while warm. Or place them in a bowl of ice water for half an hour to bring the inside temperature down rapidly; this will produce a consistent smooth texture throughout the cheese. Although best eaten fresh, it can be stored in the refrigerator at this point.
With some experimentation, I found you can pull this mozzarella cheese into strips or strings – think “homemade string cheese”. Pull the strips, drop them in the water to cool, then pack them tightly in a Pyrex container or wrap in plastic wrap. They’re not as pretty as the store bought ones, but they work just the same.
Although the original recipe recommended storing the cheese in water, I prefer storing it in a tightly sealed container without water. Water storage makes the cheese soft and washes out the salt.
Notes
Optional Lipase Powder
If you want to add lipase powder to give the cheese more flavor, use 1/8 – 1/4 teaspoon, dissolved in 1/4 cup cool water and allowed to sit for 20 minutes. To start, probably try the mild and see how you like the flavor. Add the lipase and water mixture at the same time you add the citric acid solution. If you add lipase to this cheese, you may have to use a bit more rennet, as lipase makes the cheese softer.
Can I make fresh mozzarella cheese without rennet?
Yes and no. You may be able to improvise and make your own rennet instead of buying rennet to make mozzarella cheese, but you will need some sort of rennet. My friend, Wardee from Traditional Cooking School, explains:
“Rennet coagulates milk into curds quickly, without producing acid. In my opinion, acid-coagulation (starter culture only) creates too soft of a curd for hard cheese and too much acid to create stretchy-melty perfection.”
If you have fresh stinging nettles available, you can make a homemade vegetable rennet that should work for mozzarella cheese. Cultures for Health provides full instructions for rennet nettle on their website, including substituting dried nettle for fresh. You’ll want to gather the nettle before it goes to seed, which will make it unfit for cheese making.
To make nettle rennet, combine 2 pounds fresh, clean nettle leaves with 4 cups water in a large pot. Bring to boil, reduce heat, cover and simmer for 30 minutes. Add one heaping teaspoon of salt and stir to dissolve. Drain nettle mixture in a cloth lined colander until quite dry. Use 1 cup of nettle rennet per gallon of milk. Store in a sealed, refrigerated container for up to two weeks. See “How to Make Nettle Rennet for Cheesemaking” for more detailed instructions.
What’s the Best Rennet for Mozzarella Cheese?
Either animal or vegetable rennet will work just fine for making fresh mozzarella cheese. For cheeses that are aged longer, it’s best to use animal rennet, as vegetable rennet may become bitter during the aging process. I find liquid rennet a little easier to use than rennet tablets.

Easy Ricotta Cheese from the Leftover Mozzarella Whey
Note: If you use the non-microwave method, you cannot use the whey to make the ricotta recipe below, because the whey will contain too much salt. I later read that the 30 minute mozzarella whey is not recommended for making ricotta (it says this in the cheese making kits), but mine works just fine.
Adapted from Home Cheese Making: Recipes for 75 Delicious Cheeses
Yield: About 1/2 pound per gallon of whey
Ingredients
Fresh whey, no more than 3 hours old, left over from making hard cheese
Directions (other options available at www.cheesemaking .com)
- Heat the whey in a pot until foam appears, This usually happens just prior to boiling; if the mixture boils, it will taste burned.
- Turn off the heat; let the whey set for 5 minutes.
- Gently skim off the foam and place the whey in a colander lined with butter muslin.
- Let drain for 15 minutes, then refrigerate. This ricotta will keep for up to one week in the refrigerator.
The ricotta from our raw milk mozzarella was lovely. Very smooth and creamy, and just a tiny bit sweet. It works great in homemade lasagna.
If you don’t want to make ricotta from your whey, you can add the leftover whey to smoothies, drink it yourself, or share it with livestock.

More Cheese Recipes
Another family favorite that may be even easier, although it takes a bit longer, is fromage blanc. Fromage blanc is a soft white cheese that is great as a spread or dip. (Or for topping spuds – yum!) It can also be used in cooking. The recipe only has five steps – that’s it! Learn how to make fromage blanc in this post.
We also have instructions for making large curd cottage cheese.
Originally published in 2011, last updated in 2018.
This recipe worked out amazing! Made it with my friends and we are major amateurs. Not having any experience we got it on the second try with a better thermometer and it worked out to being some of the tastiest cheese ever!
I’m so glad that it worked well for you! It’s been easy for us to make, but with the quality of some milk nowadays, many have trouble.
Hi, I’ve heard that you can use lemon juice to split the milk is this a viable method instead of using rennet or would you still need to use rennet?
That will work for some soft cheeses, but I don’t recommend it for this recipe.
I want to try the recipe, but do not know what the ingredient rennet is, how it look, or where it can be found. Please advise. I am from Free State in South Africa.
Rennet is rennet. It’s used to form the cheese curd. Specifically, from cheesemaking.com:
You can purchase it online via amazon.com through the links in the post, if Amazon.com delivers to your area. Otherwise, if you have any shops or stores that sell cheese making supplies, they will know what rennet is.
Some plants have also been used to make a rennet substitute, but I have not tried them in this recipe. This post on stinging nettle (Urtica dioica) contains instructions on how to make nettle rennet substitute.
I have made the cheese 3 times. It comes out a bit grainy. Any hints? My microwave doesn’t get as hot so I microwaved it a little longer.
I’ve never run into grainy results. Maybe try the boiling liquid method and see if it works out better?
Thank you. I used a different brand milk and cooked it to a higher temp. Worked much better.
Glad that you found a solution that worked.
This recipe was fantastic! We substituted white vinegar in place of the citric acid and it worked great. The Ricotta was awesome as well.
Thank you so much for sharing this!
Yeah! So glad that it worked out well.
Dear Joseph and Laurie
I’m excited to learn about replace citric acid by vinegar.
Which proportion ?
Is there any chance to replace rennet ?
Because there are people that only use vinegar to obtain curd and make cheese.
Is there any chance to get “mozzarella” in this way with all the manual + heat work ?
Many thanks for the answers.
You can make a nettle replacement from nettles – https://commonsensehome.com/nettles/
Joseph, did you use the same amount of white vinegar as citric acid called for?
Thanks.
What did I do wrong? I followed the instructions but after heating about 6 times it never stretched and when I kneeded it, it was dry. never got shiney. I grated it onto some corn chips and after 1 minute in the microwave it never melted! It seemed to make the curd in the beginning fine. It was all down hill from there.
It sounds like you may have overheated the curds, turning them rubbery, but it’s really hard to say for sure without being there. I’ve noticed that since I replaced my old digital thermometer (it died), the new thermometers have been less accurate and more prone to jump up and down in temperature.
from step 2 to step 3, it didn’t ever turn into any thickness than just the milk itself, no curds, no whey, just milk. Kind of disappointed, I followed it exactly!
My guess would be either your rennet was bad or not mixed properly, or the milk used was UHT (Ultra High Temperature) Pasteurized. Most store milk is now UHT and will not make cheese because the milk protein is damaged by the high heat.
Made your MOZZARELLA CHEESE today and it was soooooo amazing, so from now on this is what i will be making along with the ricotta cheese it save my family money. Please continue to share your recipes. Thanks
So glad that it worked out well for you! With the trend towards ultrapasturized milk, cheese makers are having a tougher time finding milk that will make cheese. Thanks for your kind words and sharing your success.
I will NEVER purchase mozzarella from the grocery store again! Oh, my goodness, this is delicious! I didn’t have any luck with ricotta though, after carefully following the directions for Ricotta from Heaven. Any idea why not? I used whole milk for my mozzarella, and proceeded directly from the making of the mozz into the directions for the ricotta. I do plan to try again next time, but any suggestions would be appreciated! Thanks for a delicious recipe!
I don’t know for sure. Ricky says the ricotta doesn’t normally work with the 30 minutes mozzarella, but it always has for me. I start with raw milk from Guernseys. I don’t know if that makes a difference or not.