How to Make Homemade Chicken Broth
This post may contain affiliate links. Read my full disclosure here.
This homemade chicken broth recipe serves as the base for many great dishes, including the best homemade chicken soup. If you’ve never made chicken broth, you need to add it to your recipe routine. It’s a great way to s-t-r-e-t-c-h your chicken dinner into extra meals.

When I make broth, I usually start with chicken carcass leftover from a whole roasted chicken or a stewing hen. You can also use a combination of bony parts like backs, necks, wings and the always awesome chicken feet. Chewy bits are good.
Have beef bones instead? See “How to Make Beef Stock from Scratch“.
You want to slow cook and break down all that connective tissue and the bony bits to get the maximum amount of nutrients. Heck, I’ve even made delicious chicken bone broth with nothing but chicken feet. (Don’t tell my mother-in-law. She’s been scared to eat my soup since she found out I use chicken feet.)
To make a BIG batch of broth and save cooking time, I’ll freeze up several chicken carcasses, and then load them into a large stockpot with extra feet, veggies and herbs, vinegar and enough water to cover. Same amount of cooking time, more stock at the end.
PrintHomemade Chicken Broth

Use this simple homemade chicken broth recipe to make the best chicken soup you’ve ever tasted, or use it as a base for other delicious soups and recipes.
- Prep Time: 10 minutes
- Cook Time: 8 hours
- Total Time: 8 hours 10 minutes
- Yield: 24 cups 1x
- Category: Soup
- Method: stove top
- Cuisine: American
Ingredients
- 1 stewing bird or 2 to 3 pounds of bony chicken parts, such as necks, backs, breastbones and wings
- 2–4 chicken feet (optional, but great if you have them)
- 2 tablespoons vinegar
- Enough water to cover
- Veggies and herbs of your choice, such as bay leaves, peppercorns, turmeric, carrot tops and peelings, celery leaves and trimmings, onions, leeks, scallions, garlic or parsley.
Instructions
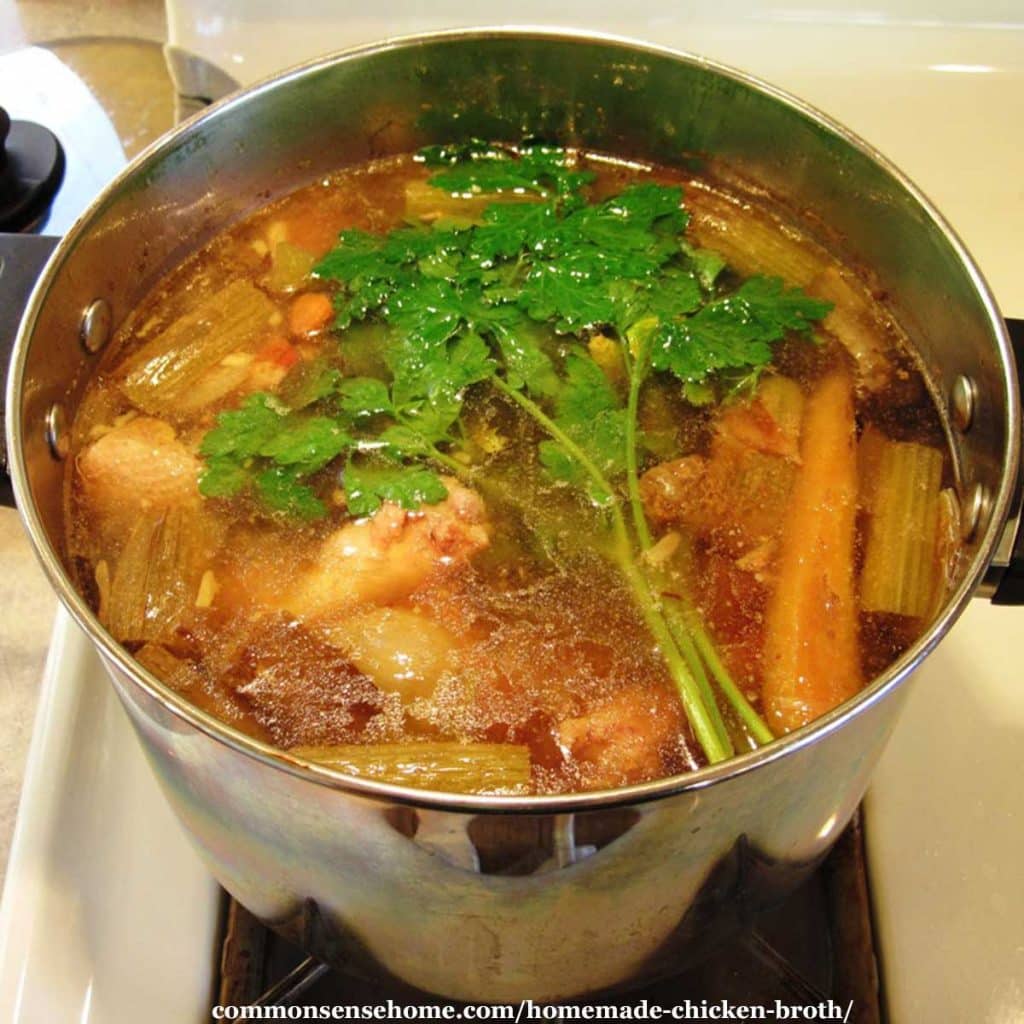
Place chicken in a large stainless steel pot with water, vinegar, herbs and veggies. Let stand 30 minutes to 1 hour. Turn on heat cover and bring to a simmer. (You can also do this in a crockpot.)
Let simmer for at least 6 to 8 hours (up to 24 hours). Add more water if needed to keep the carcass covered and make sure your stock doesn’t cook dry. (Make sure to top off the water if you’re going to leave it on the stove top overnight.)
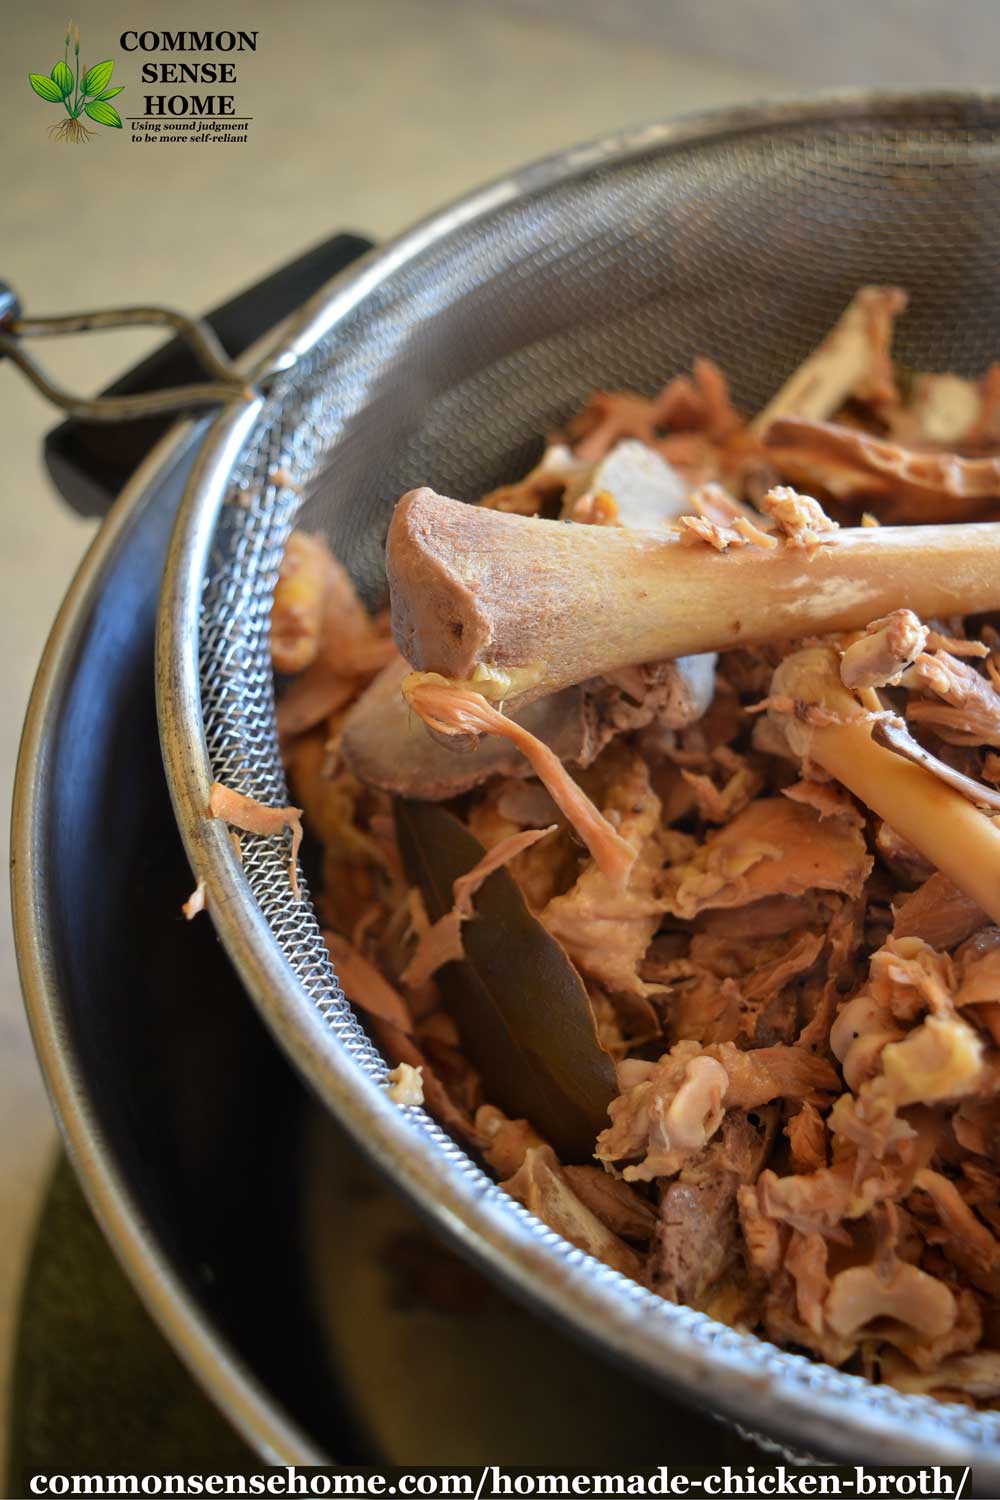
If I’m cooking a whole bird for stock, I pick the meat off the bones at around the eight hour mark. To remove chicken pieces, use a slotted spoon or tongs to lift bird hunks out of the broth. Let cool and remove chicken meat from the bones. Return the carcass to the pot to continue simmering.
When you’re finished cooking your homemade chicken broth, strain the stock into a large bowl or other container. Place the container in the refrigerator until the fat rises to the top and congeals. Skim off the fat and use it for cooking. (Check out the schmaltz post for more info on rendered chicken fat.)
Notes
Keep broth refrigerated or frozen, or can or freeze dry for longer storage.
Nutrition
- Serving Size: 1 cup
Quick Soup Recipes with Chicken Broth
For simple chicken soup, I dice up some fresh carrots, onions and celery; mince a couple of cloves of fresh garlic and toss those in; and clean the meat off the bones and chop it into bite sized chunks. I add some salt, pepper and curry powder for seasonings. Finish it with drop egg noodles or noodles of your choice.
To make drop noodles, simply beat several eggs and then mix in enough flour to form stiff dough. Drop by spoonfuls into gently simmering soup, stirring occasionally so they don’t stick together.
If you like, you can pair your homemade chicken soup up with a salad or homemade bread. Check out “13 Homemade Bread Recipes” for more ideas.
You can use this broth as a base for many soup recipes, including:
- Chicken and Gnocchi Soup, Olive Garden Style
- Cheese Soup in Homemade Bread Bowls
- Chicken Wild Rice Soup – Rich and Creamy
Why make Homemade Chicken Broth?
With commercial chicken broth readily available, why bother making your own?
- It’s easy, and it’s delicious. Seriously – you won’t believe how much better homemade tastes.
- You save money. Free range and organic chickens are fairly expensive, so I want to get as many meals as possible from each bird.
- Turn those chewy and bony bits into good food. Respect the bird.
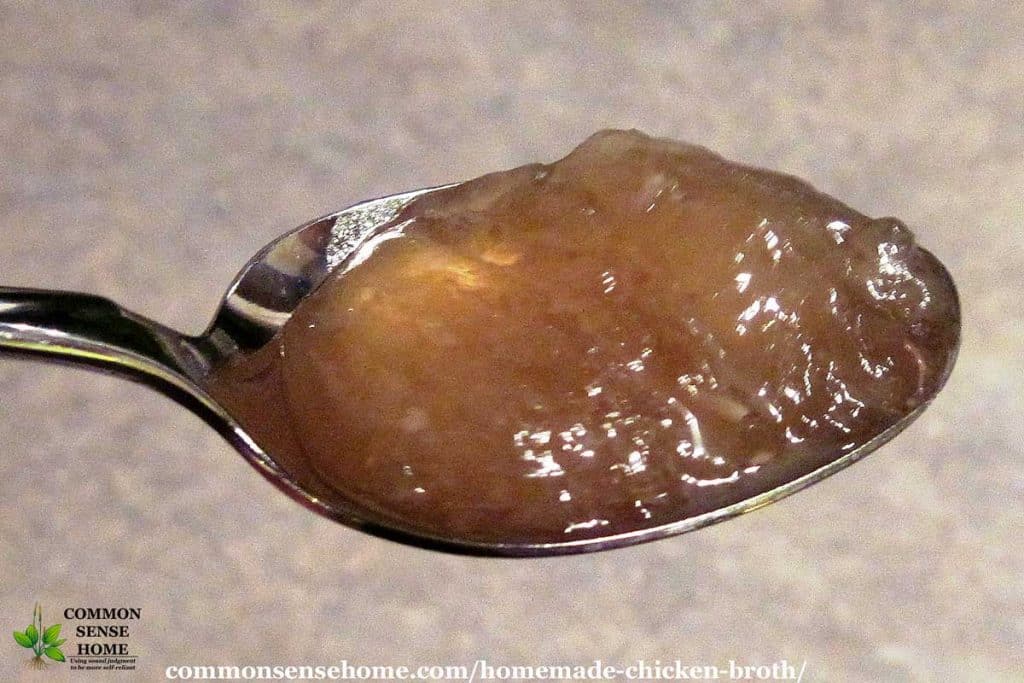
- Homemade chicken broth is a health food. It’s loaded with gelatin (especially if you use feet and/or pastured chicken parts), an assortment of minerals, chondroitin sulfate (like those high priced joint supplements) and protein.
Adding vinegar to your homemade chicken broth helps to draw the minerals out of the bones. The longer the cooking time, the richer and more flavorful the broth will be.
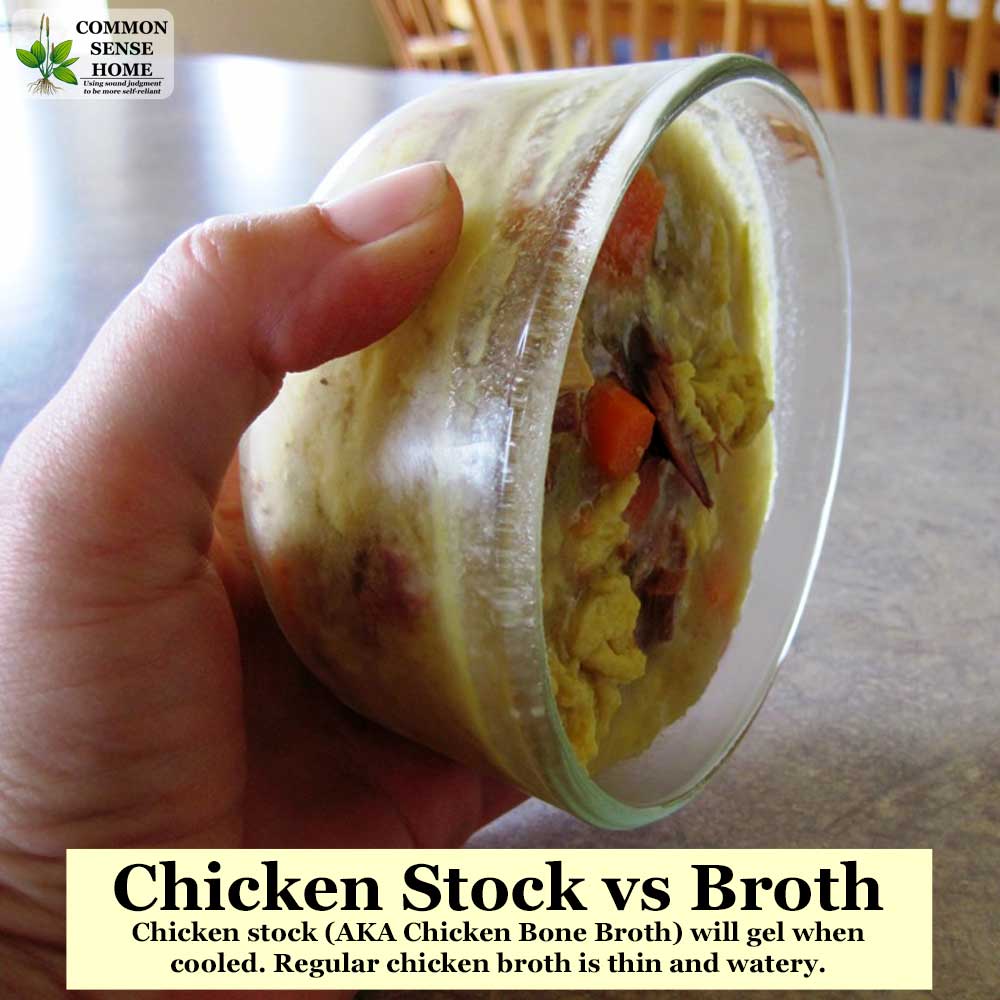
A proper chicken bone broth will jiggle with gelatin when chilled. (Stewing birds and chicken feet improve your odds of gelling.) If you’re using rotisserie chicken, you may not be able to get your broth to gel. Chickens that get a chance to run around use their bones and connective tissues more, whereas confined chickens focus on growing meat. It’s easy to see if your homemade chicken broth has a lot of gelatin, because it will gel as it cools.
These chicken bones have simmered for around 24 hours. Notice how the end of the bone appears porous and all the connective tissue has fallen apart.
Chicken Stock vs Broth
Traditionally, “chicken stock” meant the product that results from long, slow cooking of the bony parts of chicken. It gels when cooled. “Chicken broth” more commonly referred to a product cooked for a shorter time that does not gel. “Chicken bone broth” is the same as chicken stock.
Nowadays, the terms are commonly used interchangeably. Mom simply called it “making chicken soup”. The book Nourishing Traditions calls their version of stock “broth”, so that became my default term.
Would you like to save this?
What is the difference between chicken stock and chicken broth?
The big difference between homemade broth (or stock) that is cooked low and slow and commercial broth is flavor. Pop open a container of commercial broth, and it tastes like chicken flavored water.
Slow cooked broth adds richness and better mouth feel to soups and other dishes. Low, slow cooking also draws more nutrients out of the chicken parts.
Can you substitute broth for stock (bone broth)? Yes, but the flavor won’t be as good.
Do I Have to Use Chicken Feet in my Chicken Broth?
No, but they are a great way to bump up the gelatin/collagen content of your broth. People pay big bucks for collagen supplements. Those tough little chicken tootsies are loaded with gelatin, which is great for tummy troubles like stomach bugs. Bone broth also aids digestion.
If you raise your own chickens, you can get the feet for free. If you get your chickens from a local grower, odds are they’ll be willing to throw in the chicken feet at a nominal cost because many people don’t know how to use them.
The photo below shows a frozen block of chicken feet. Smack on counter to break up or pry off feet as needed.

But What About the Chicken Poop?
Chicken feet are coated with a thick layer of tough skin, and the nails on the foot are covered in sheaths. Usually feet are skinned right away when the bird is being plucked, and the nail sheaths are pulled off. This means that no part of the foot that was in direct contact with chicken poop or other questionable items goes into your homemade chicken soup.

Jenny from Nourished Kitchen has a post with more details about how to skin the feet in her post, “Voodoo Stock: Chicken Feet and Chili Peppers“.
Storing Chicken Broth
To store homemade chicken broth for longer periods, I usually freeze or freeze dry. (Homemade broth may also be pressure canned. Use 1 inch of headspace and process pints for 20 minutes and quarts for 25 minutes, at ten pounds pressure.)
To freeze, I place the homemade broth in freezer safe containers with about an inch of headspace, label and date. I try to use frozen broth within about six months.
To freeze dry homemade chicken broth, I chill the broth and spread it evenly on my freeze dryer trays. I do use pan liners so the broth releases easily from the pans after drying.
I don’t recommend freezing it in ice cubes trays and then freeze drying the ice cubes, as the cubes will stay intact during the freeze drying process and the centers are unlikely to freeze dry properly. (You could use mini ice cube molds. Just keep the diameter under half an inch.)
The trays get loaded into the freeze dryer and I fire up the automatic cycle. Since broth is high in moisture, it usually takes at least 30 hours, depending on the amount of broth.
When freeze dried, the broth texture is similar to Styrofoam (if the trays were full) and vellum (if the broth was thinner in the trays). I store the freeze dried chicken broth in Mylar bags with oxygen absorbers, and keep a small jar in the fridge for regular use. It makes a great low salt chicken bullion.
Here’s a video of the homemade chicken broth before and after freeze drying.
If you’d like to learn more about home freeze drying, visit Home Freeze Drying – What You Need to Know Before You Buy a Freeze Dryer.
CLICK HERE TO ORDER OR LEARN MORE AT THE HARVEST RIGHT WEBSITE
My referral link: https://affiliates.harvestright.com/115.html

If you choose to purchase a Harvest Right freeze dryer through my site, I receive a referral commission at at no extra cost to you. (Thank you!)
Originally posted in 2010, last updated in 2019.
Yummy! You make me want to put another flock together in the spring! 🙂 I love watching chickens ‘play’ and they make darn good eating too plus eggs. Thanks.
What is the quality of the stock/broth if you pressure cook it instead (ie Instant Pot?) Is it more desirable to do it on the stove?
I prefer the flavor of a low and slow simmer, but you can make chicken stock in the instant pot that gels. Just prep as you would for the slow simmer, and cook for 120 minutes.
If scorching your broth on the stove top or in the crock pot is an issue, the instant pot can eliminate that risk. It’s also faster, of course. Those on the GAPS or AIP protocols may tolerate instant pot bone broth better because it contains less glutamates and histamines.
I started making my own chicken broth a couple years ago and LOVE it! I truly can’t imagine going back to store bought. We love garlic so I put in plenty. Finger-lickin’ good, for sure.
The store bought broth tastes flat and lacking in flavor to me compared to homemade.
I just make bone broth with feet and carcasses. I’ll add the same vegetables as for broth and use it in place of regular broth for added nutrition. When I harvest older hens and roosters, I pressure can the meat. It turns out lovely and tender.
I’m new at making stock. Why are the feet important? Also I usually just make broth from a leftover rotisserie chicken from the grocery store. Will that still give healing benefits?
There’s nothing wrong with getting all you can out of a rotisserie chicken by making broth with the carcass, but if you can get access to a pastured bird and feet, the results will be a superior product. The feet are loaded with connective tissue, which breaks down during simmering to enrich the broth. Pastured birds also have a much wider diet, introducing more trace minerals to the broth. I’ve made broth with a rotisserie chicken carcass, and in most cases it barely gels when cooled. When the feet are added, the broth will solidify let set up jello.
Welcome, Jennifer. Lucky you – homegrown poultry makes the best stock. I hope you saved the feet for broth. They really do make a difference.
I just now seen your fb page & blog… so glad. I've got a homegrown roosters with carrots, onions, cerlery & seasoning cookin away in a pot for dinner (chicken a' la king) & I was thinkin that was how I could make my own stock 🙂
I know that you need to clip the toenails off to be kosher, but as for their ability to make stock, they work just fine "as is".
I know what you mean about being behind in reading posts. Just not enough hours in the day.
Awesome stock Laurie! Have you ever heard that the claws have to be clipped off on the chicken feet? My friend Tara who lives here in my area told me you should clip them off. Sadly, I still have not gotten around to using my feet, which are in the freezer, for stock because I've been wondering how to deal with the claws and I don't have any kind of implement to clip them.
I need to get around and look at all your posts and many other of the blogs I love. I have been so behind on that. Thanks for sharing this great post about a very important activity more people should be doing in the kitchen. 🙂
I am well aware of what chicken do every day, as I was raised on a farm where we raised large flocks of chickens, geese and ducks for many years. I'd estimate I've helped butcher several hundred birds over time. I'd usually get stuck with skinning the insides of the gizzards, among other tasks. I personally didn't find the smell any worse than plenty of other farm smells.
I am very grateful to my neighbors for sharing their birds, and in return I often barter produce I've raised in my garden. Country neighbors are the best!
Hey All,
Have you ever even considered what the REAL chicken's feet look like just going about their daily "business?"
These pictures are wonderful and I can't wait to find a supplier and make some really good broth.
I used to watch my grandma slaughter chickens and then take them inside to de-feather them. The stench was overwhelming. Already cut and
skinned is nothing in comparison.
Be grateful that you are able to get such a product and render it fit and wholesome for your family.
Thanks for stopping by, Annette and Martha. I love Kelly's blog, too.
As I mentioned in Kelly's comments, I have taken to cooking the feet separate from the meaty bones to avoid getting toenails in my soup (not a big deal to us, but sometimes freaks out guests).
Martha, you want to make sure to skin the feet because even in the best of conditions (these chickens had plenty of room to run outside in open grass) they run through things that I wouldn't want to put in my mouth (chicken poop, for starters :-). Removing the skin gets rid of everything that was in contact with the ground, etc. The toenails even have outer casings that pop right off. Occasionally you may find a sort of callus/gall on the bottom of the foot where the bird was injured at some point but it created discolored scar tissue. This can be trimmed off and the rest of the foot used. This is more common with older birds, for instance retired laying hens. The older birds actually make the best broth because they've had more time to build up their bones/cartilage/skeletal structure.
Hi! I found your post from your comment at Kelly the Kitchen Kop. Why do the feet need to be skinned?
Hi Laurie! I'm visiting you from Kelly the Kitchen Kop's blog and I must say, this the most incredible, step by step article on making chicken broth right on down to making the soup!
Thank you! You took the "scary" out of it! It looks and sounds delish!
You have a root cellar! I am oh so jealous.They were such a common thing in northern Minnesota where I grew up.
Laurie, I must say this is one of the best broth postings I have come across. Though you really got me laughing over the bag of chicken feet making me remember our hog butchering day last Fall….go here http://seedsofnutrition.com/?p=4326 to see my hog legs if you haven't seen it yet.
I really like your use of a jelly bag for straining. I'm going to have to purchase one. That beats cheese cloth and other methods.
“Wow” you are a genius for sure what great ways to get ranked high and obtain good traffic flow from your article. Thank you for sharing your information it was very good reading for sure. I am looking forward to any more of your articles you produce in the near future.
studied home
Thanks! The carrots are holding up pretty well in the root cellar, so that's a help.
How neat! This is a perfect soup to begin spring. It's looks delicious!